Beginner’s Guide to Photography – How to Shoot Manual Mode

Are you a passionate, beginner photographer with a desire to expand your knowledge? Want to achieve more with your camera and produce higher quality images?

If you’ve been dreaming of shooting in manual mode but you’ve been scared of all the complicated settings… I got you! There’s no need to postpone the move to manual or to feel confused by your camera. This complete guide for how to shoot manual mode is here to HELP!

Get ready to set your creativity free with new opportunities only achieved by shooting manual! Sure, using the “Auto” mode is a safe and sound way of getting your pictures done quickly and pain-free, but where’s the fun in that?

To master manual mode, we need to learn how to control the four important elements of photography: ISO, shutter speed, aperture and white balance.

Let’s delve in and get on our way to flawless manual photography. Are you ready?

Why shoot in Manual Mode?
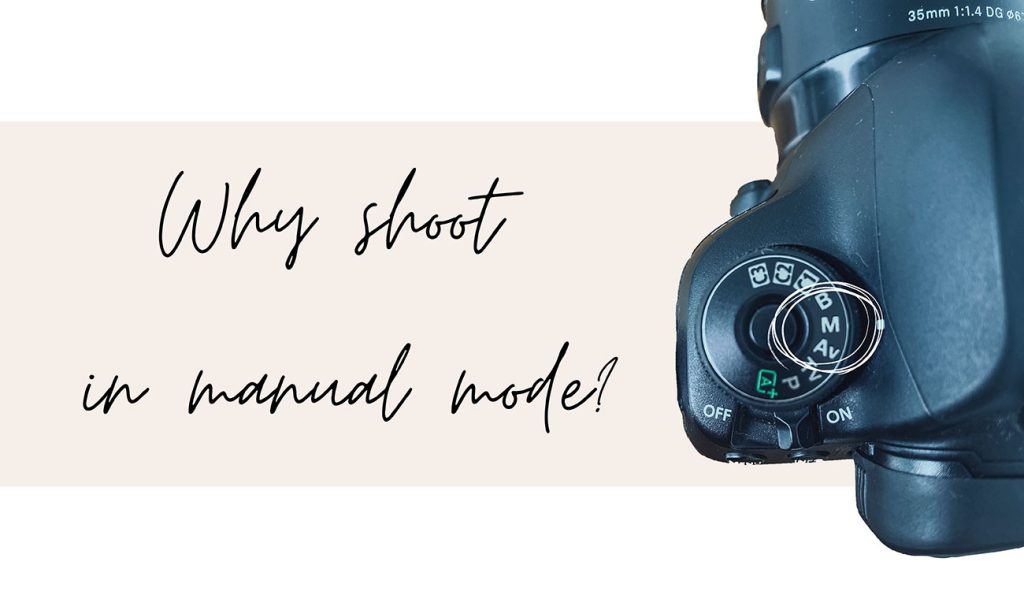
Why shoot in Manual Mode

Let’s say you just bought a new, fancy, professional camera (oooh, eer). You’ve been taking pictures with it for a while, using mostly the Auto mode, and while your pictures are high-quality, you keep looking at other creator’s work (done with the same gear) and it’s just… different. You notice they’re doing a better job, maybe their pictures have a more cinematic look to them or a more professional feel overall. What’s the difference? You might ask. What are they doing differently? Heh, the answer is simple, my friends: they’re shooting in manual mode.

What is Manual Mode?

Okay, but what’s so amazing about shooting in manual mode compared to other modes? Easy: when you do manual photography, you have absolute control over all your camera’s settings – ISO, shutter speed, aperture and white balance. 

These terms sound scary to you? Don’t worry, I’ll cover each of them down below. When you shoot in Auto, you basically let your camera “decide” everything for you. And professional photographers don’t really want that, do we? Nope. We want control.

If you’ve been dreaming of achieving pretty bokeh portraits (those beautiful blurry, artistic backgrounds), taking moody flat lays or shooting movement without ending up with blurred blobs of subjects, your camera’s manual mode is the answer. While the automatic mode is a good way of taking straight-forward pictures, this “universal” mode does not work perfectly in all situations, unfortunately. 
Here’s another situation: let’s say you want to shoot a gloomy portrait in low light. Your camera’s flash will automatically turn on, although you’d prefer to not use any external light. This ruins your setting and it can get pretty frustrating at times. The solution? Once again, Shooting manual.

Sure, there’s a… let’s say ‘downside’ to this shooting mode – everything will take a bit longer. While it’s quick and painless to take a picture on Auto mode, achieving that perfect result will require a bit more patience and experimenting when it comes to Manual mode. At least at first, while you’re getting used to everything!

TIP: I know I’ve mentioned about ten times now that shooting in manual mode is THE best way to go, but if you’re just starting out and you need to shoot something in movement, such as street or sports photography, it’s best to set your camera to a quicker mode such as Auto or Aperture priority. It’s better not to lose your shot completely in these situations, so make sure to set your priorities straight!

Now that you know everything about all the advantages of shooting manual over automatic, let’s dig in deeper and find out how to ACTUALLY do it!

4 Important elements to master for shooting in manual mode

1 – ISO
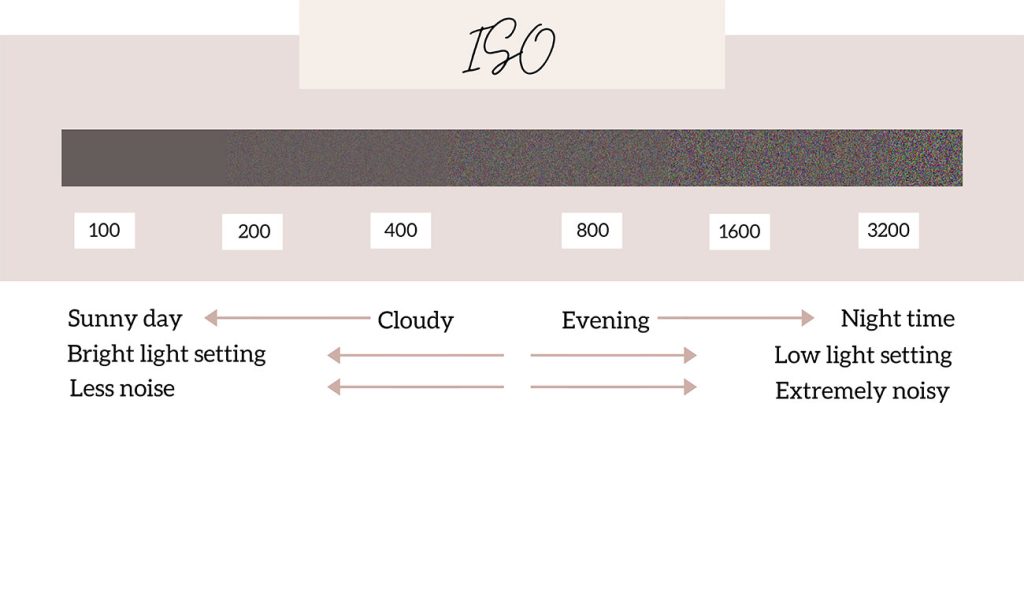
ISO cheat sheet

ISO. Three letters, an ocean of questions. What’s up with this ISO everyone’s talking about? 

If you want me to get super specific, I can tell you that ISO literally means “International Organization for Standardization”, but that surely won’t be very clarifying. So let me explain it in standard human words. In short, ISO means your camera’s sensitivity to light. Unlike the shutter speed or aperture, which are both physical settings, ISO is a digital adjustment that your camera makes according to the setting you’re photographing. Or, more accurately, a digital adjustment that YOU make! We’re talking about all-manual shooting, baby!

FUN FACT: If you’re familiar with film photography (at least a tiny bit), you might know that different films have different values written on the package (100, 200, 400). This is the film’s sensitivity to light. Exactly like a digital camera’s ISO.

In short, if you set your ISO to a higher number (let’s say 800 or 1000), this means you’re allowing your camera to pick up more light from the environment. This is a great way to compensate for the lack of light in some “harsh” conditions. On the other hand, if you’re shooting on a sunny day, it’s best to set your ISO as low as possible, such as 100.

TIP: After a lot of experimenting with different ISO settings in dark conditions, I recommend to not set your ISO too high (above 1600, for example), as this will result in higher chances of ending up with a lot of noise in your pictures. 

Of course, this depends on how high your camera performs. A way to avoid raising your ISO, for example, would be widening your aperture instead. To prevent your ISO going too high, I’d go for that. If these words still sound strange to you, don’t worry, by the end of this article you’ll understand everything I’m saying here.

What is noise?

what is noise in photography

In photography, “noise” is similar to grain and it pretty much looks like little bits of discoloration or strange-colored pixels. In short, noise makes images look bad and “uneven”. This visual flaw often happens when shooting in low light.

In order to better understand what the HECK I’m talking about, the key is to experiment. Here’s a short ISO challenge that you can try. Go outside at different times of the day. Decide on a fixed shutter speed and aperture, but play with the ISO.

First, set it to 100 – if it’s super sunny outside, you’ll see that your picture ends up pretty balanced. Then raise it to 400 – if it’s a bit cloudy, this ISO value could work best. If it’s dark, let’s get serious and set the ISO to 1600. You can consider this to be your cheat-sheet, but the best way to get used to all this information is to try out different settings and see what each of them does.

2 – Shutter speed
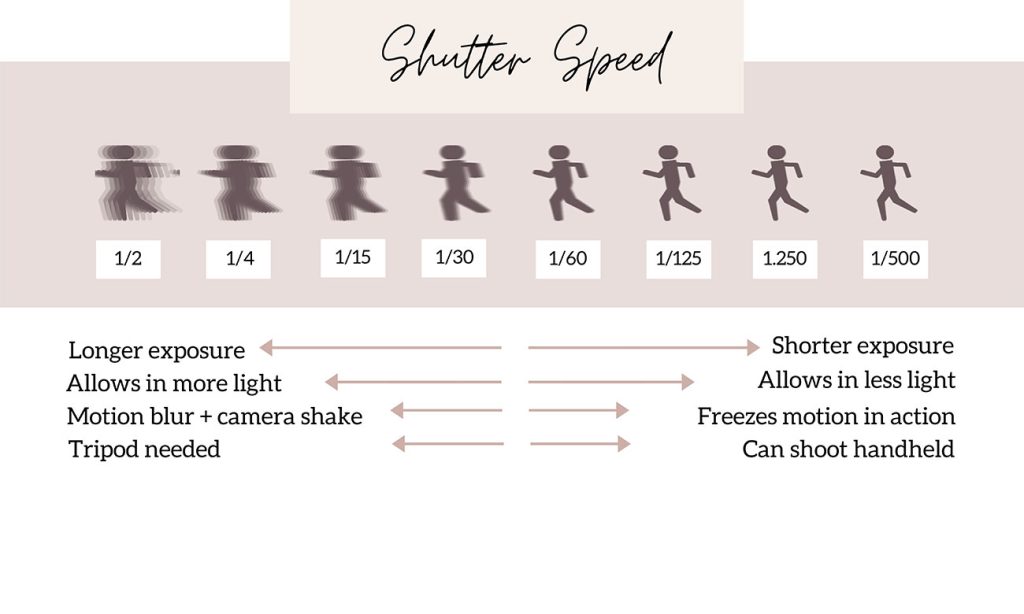
shutter speed

Okay, let’s proceed to the next term. Shutter Speed. This is literally the amount of time your camera’s shutter stays open when taking the picture. During this time, light gets in and “tickles” the camera’s sensor, and then the image is “born”. 

Following this logic, if your shutter stays open for only a super short amount of time, your image will end up being darker. If the shutter stays open for longer, this means more light can get in and reach the sensor, so your image will be brighter.
Easy, right? I told you I can explain this stuff! 

Another conclusion to these facts is that, if your shutter stays open for a short time, your photographed subject will “freeze” in the frame instantly, whilst if your shutter stays open for longer, you’ll end up with some motion blur. 

TIP: If you’re taking action shots, setting your camera to a faster shutter speed is the way to go to get your subjects perfectly sharp and in focus. 

A standard shutter speed to play around is 1/125, which literally means a fraction of a second. By the way, it’s best to not set your shutter speed below 1/60, as you’ll end up with shaky images. If you don’t have any other solution, make sure you’re using a good tripod to avoid blurriness.
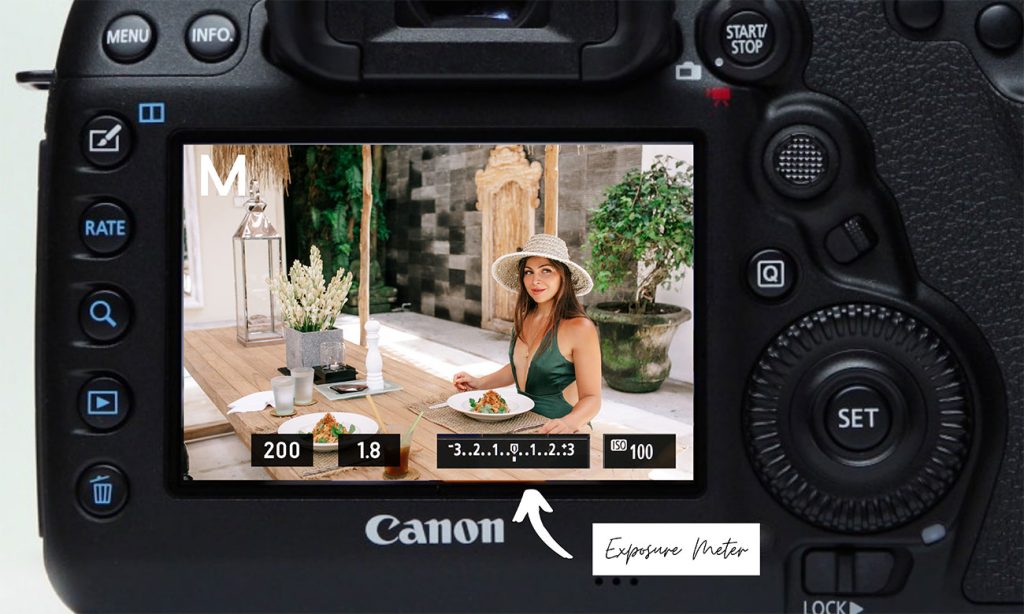
how to use shutter speed

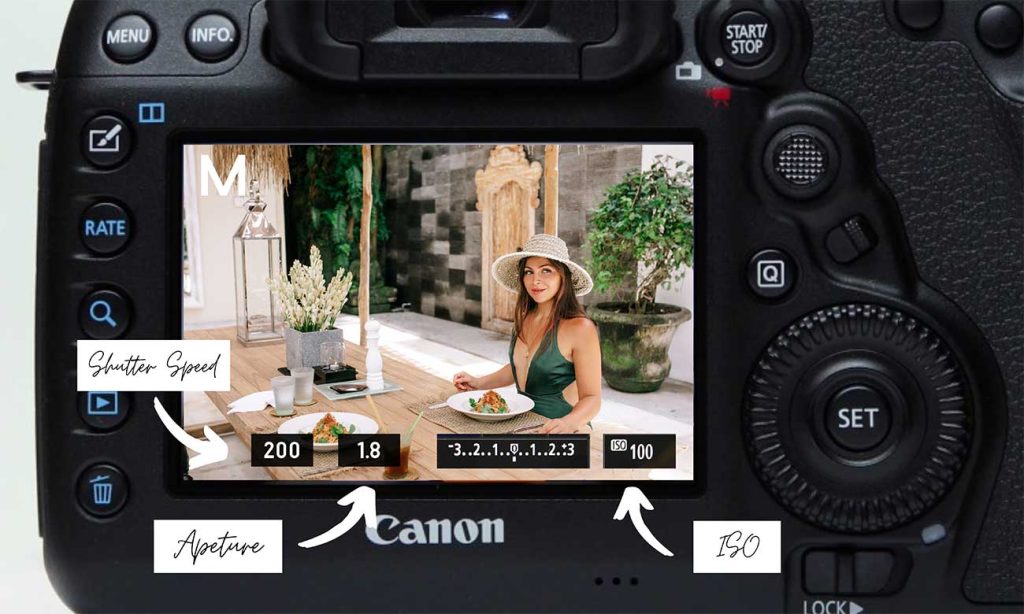
EASY CHEAT: No matter which of the settings you are adjusting (ISO, shutter speed, aperture), you’ll want to always be aware of how your changes are effecting the final image. An easy way to keep on top of this is to check your camera’s exposure meter. You’ll find this meter by looking through the viewfinder. It’s basically a long horizontal line with many vertical lines. The bold vertical line in the middle with a “0” underneath is the setting you are aiming for. Think of the meter as a way to gage that you are achieving a balanced image and the central “0” point signifies that you’ve got it “just perfect”,

This is a good place to start when starting off on manual mode, so make sure to check your meter each time you adjust your settings. Of course, this is just an approximation dictated by your camera, so, as I mentioned before, when you’ve gained some confidence, make sure to experiment with this too!

3 – Aperture
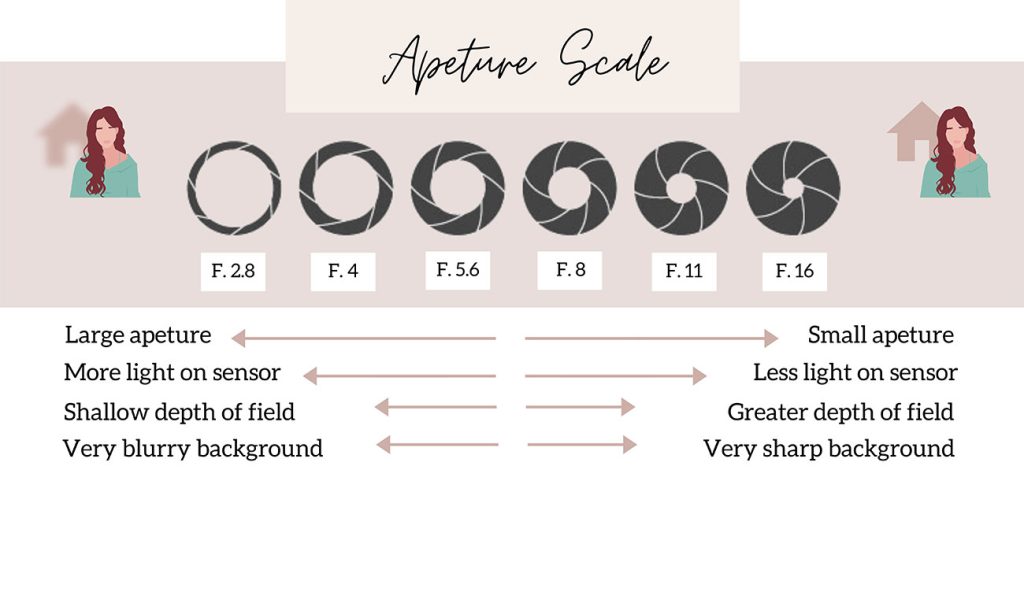
Aperture cheat sheet

Okay, here’s where things get a bit more complicated, but please bear with me. The meaning of “aperture” is pretty intuitive. It’s basically an opening in the middle of your camera’s lens that dictates how “open” your lens is. Following this logic, if your aperture is large (wide opening), your image will be brighter; if your aperture is small, your image will be darker. The reason why I’m saying that things are a bit more complicated when it comes to aperture is because the numbers are… the other way around.

Hear me out: a bigger aperture of your lens (also known as an f-stop) is f/1.4, for example. Big aperture equals small value. Counter-intuitive. On the other hand, a smaller aperture is f8, for example. Smaller aperture means bigger value. You get me? Confusing I know. 

Another super important thing to know is that aperture is also responsible for how much of your subject or setting will be in focus – a thing called “depth of field” in photography. Hey, we’re already getting to a PRO level here! 

If you want professional looking images where the subject is in focus and it has a blurry background with lots of pretty bokeh, you’ll want to go for a bigger aperture, so smaller values – such as f/1.4. The same works the other way around: if you want an image where everything is super sharp and in focus (maybe a landscape?), go for a bigger aperture value such as f/8.

TIP: A good, middle value to start experimenting with is f/5.6 And maybe a good idea would be to avoid f/11 or f/16 in the beginning, as your pictures may end up super dark or look dull and boring.

CHEAT-SHEET: 

4 – White balance

White balance cheat sheet

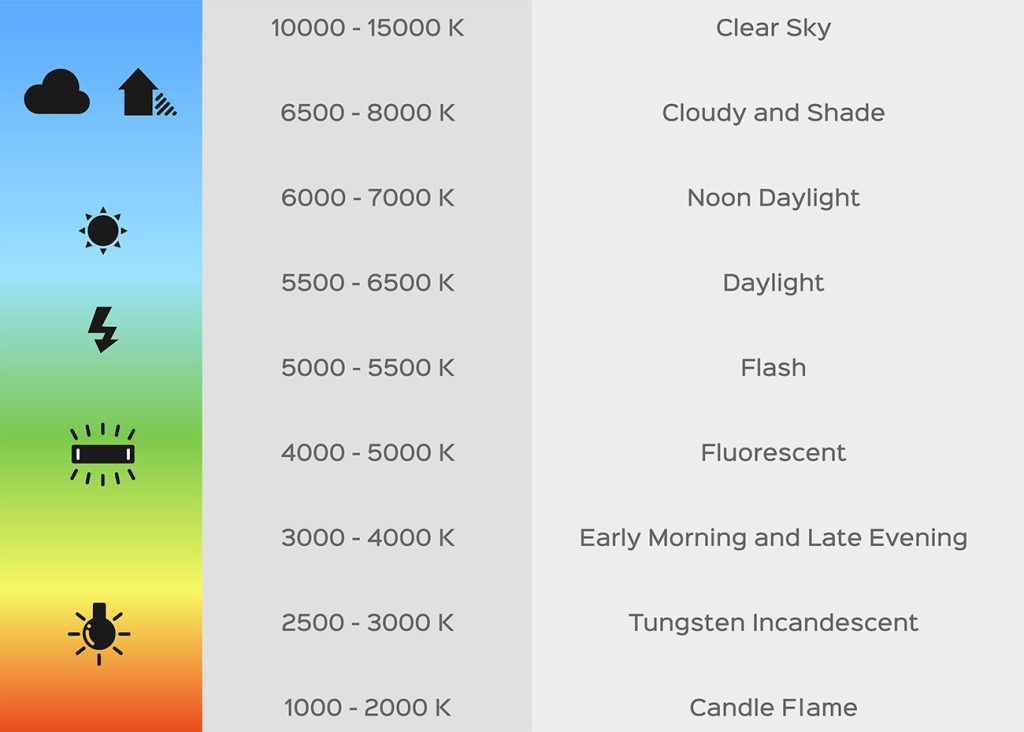
Good news: we’re done with all the complicated terms! White Balance is a simple concept which I’m sure you’ll understand right away. Your white balance settings will basically determine your image’s tones – either warmer or cooler. Of course, this has everything to do with your light source: the sun, a lightbulb, a neon light etc. 

For starters, you might want to achieve a neutral result, good for product photography, for example. This means your tones won’t be neither yellow-ish, nor blue-ish, but something in the middle… meaning balanced! White Balance, get it?! The logical way to do this is to have a colder White Balance if you’re working in a warmer environment and a warmer one in a colder setting. These values will balance each other and you’ll end up with a neutral image. The best way to do this is to look at the white values in your image.

Of course, this isn’t a rule to live by. Your image’s tone is a key element in dictating the mood of your photograph, so you can very well go for warmer or colder tones if this will help your end result. Generally speaking, your WB preferences can’t be wrong! And, after all, you can always tweak this in post-production, especially if you’re shooting in RAW format (more about this below). 

TIP: Tweaking your white balance is a great way to fix red skin in your pictures. So make sure to experiment with different White Balance settings!

There are also useful presets/modes that you can use – such as the Tungsten one (good if you’re shooting under a warm light bulb) or Daylight (good for shooting outside when it’s sunny). For starters, you can grab your camera and start experimenting, starting with a white balance of 5300 if you’re outside, for example. 

CHEAT SHEET: 

Things to keep in mind when shooting in Manual Mode
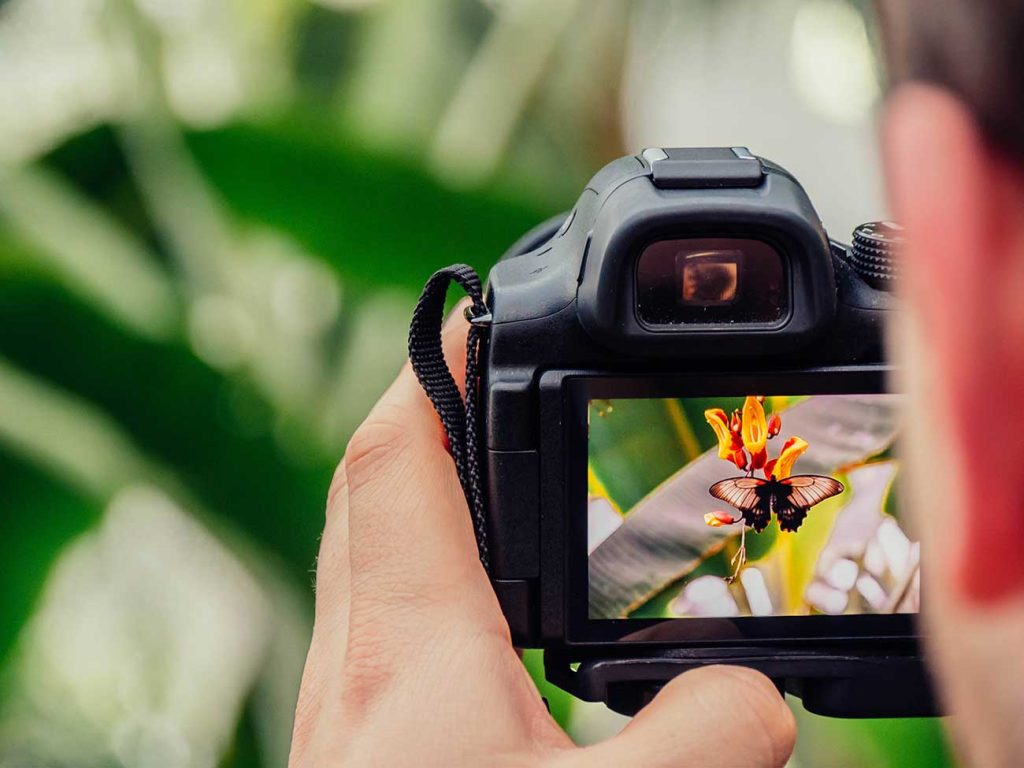
Things to keep in mind when shooting in Manual Mode

Now that you know everything about the basics and the most important elements for shooting in manual mode, read on to find my list of things to keep in mind when shooting manual:

  1. Don’t be afraid to experiment! Taking digital images is free, so your mistakes will cost you literally nothing!
  2. Don’t rush; take your time to find the perfect settings for your shot each and every time. With time, you’ll get more and more used to the process and everything will be faster!
  3. Make sure you don’t forget to tweak your settings when your shooting conditions change, such as the amount of light you have, moving indoor or outdoor, or the movement of your subject;
  4. And probably the most important advice: make sure you shoot in RAW mode. Ditch the JPEG mode for the RAW one, my friends! When you’re shooting RAW images, this means you’ll have complete freedom when you’re editing and post-processing your photographs. You can freely change the white balance, the exposure, contrast, highlights, shadows and everything in-between. The JPEG format definitely won’t offer you as much freedom in the editing stage. Mark my words, RAW is the way to go! After edits, just export your image as a JPEG and you’re good to post!

RELATED READ: What’s in my Camera Bag – All My Travel Blogging Gear

Step-by-step guide on how to choose your settings on Manual Mode

shooting in Manual Mode
how to choose your settings on Manual Mode
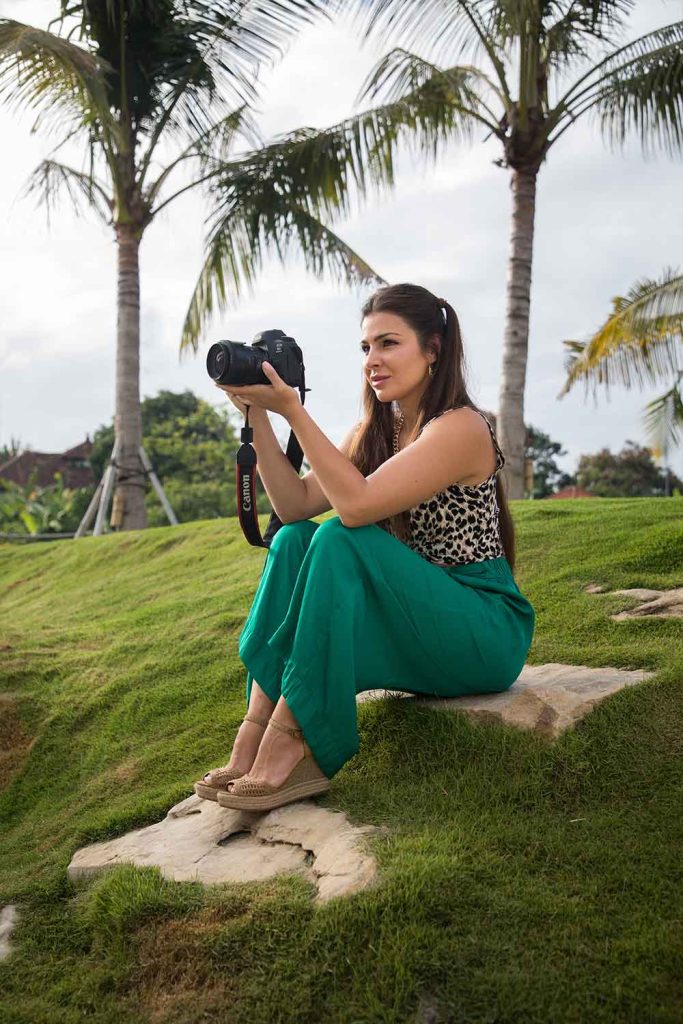
First step: set your camera to Manual Mode, of course! You’ll see that most cameras have a little wheel with some letters on them and M stands for Manual. 

Next, it may be a good idea to start on a sunny day. Here are some good settings for this:

You can start with these settings and see how your final picture looks. Analyse the result and decide if you need to tweak your settings or not. If your picture ends up being too dark, you might want to change your shutter speed to 1/250. Remember to always check your meter, most of the times it approximates correctly!

Again, don’t worry if your picture isn’t perfect. In fact, practice makes perfect and you can always adjust all the 4 settings I was talking about above in order to achieve your desired result. Afterall, photography is art and art is all about preference!

Wait, what about the focus?

Manual focus vs auto focus? I didn’t tell you anything about them until now! Well, I prefer keeping my focus on auto (AF), even when I’m shooting manual. Your focus is a separate thing from your other settings, so nobody will blame you for keeping it on automatic! In fact, in most scenarios this is better. And quicker! In case your autofocus fails and you’re doing some close-ups of specific areas of your subject then sure, release the beast and go manual with your focus as well (MF).

RELATED READ: Sparkler Photography – The Secret for Perfect Sparkler Pictures

BONUS: Other shooting modes (Program, Aperture Priority, Shutter Priority)
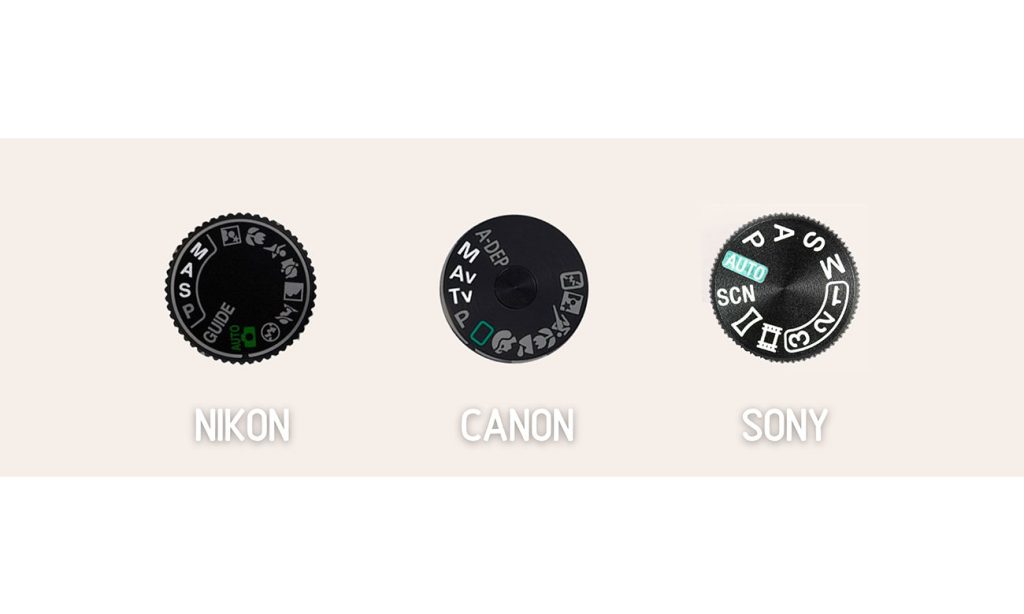
camera modes

I recommend taking things slowly, step-by-step. If you’ve only been shooting on Auto mode until now and you don’t feel comfortable jumping into the world of manual shooting right away, a good idea is to start building your way up by experimenting with the other modes on your camera. Here they are below, explained:

Aaand that was about everything I wanted to tell you in this manual photography tutorial! If you’ve carefully read this article about how to use the manual mode on a DSLR camera, then you’re ready to grab your camera, go out and experiment with all these settings.

P.S.: Sign up to my resource library and you’ll find a great Manual Mode Cheat Sheet there with all the information you need + other useful stuff!

Remember: don’t be afraid to experiment, take your time and take things slowly. If you follow everything I explained above, you’ll be a professional in no time. And practice, practice, practice! I have found that taking my camera everywhere with me helped me get used to doing photography in manual mode much faster. So what are you waiting for?

xoxo,

Melissa 

Want to know more about travelling to Bali?

Pin it for later!

Beginners guide to manual mode photography tips
Shooting in manual mode - a beginners guide

Sign Up For My Newsletter!

Want to stay in the loop? Join my exclusive mailing list, plus you’ll gain access to my ever-growing free resource library!


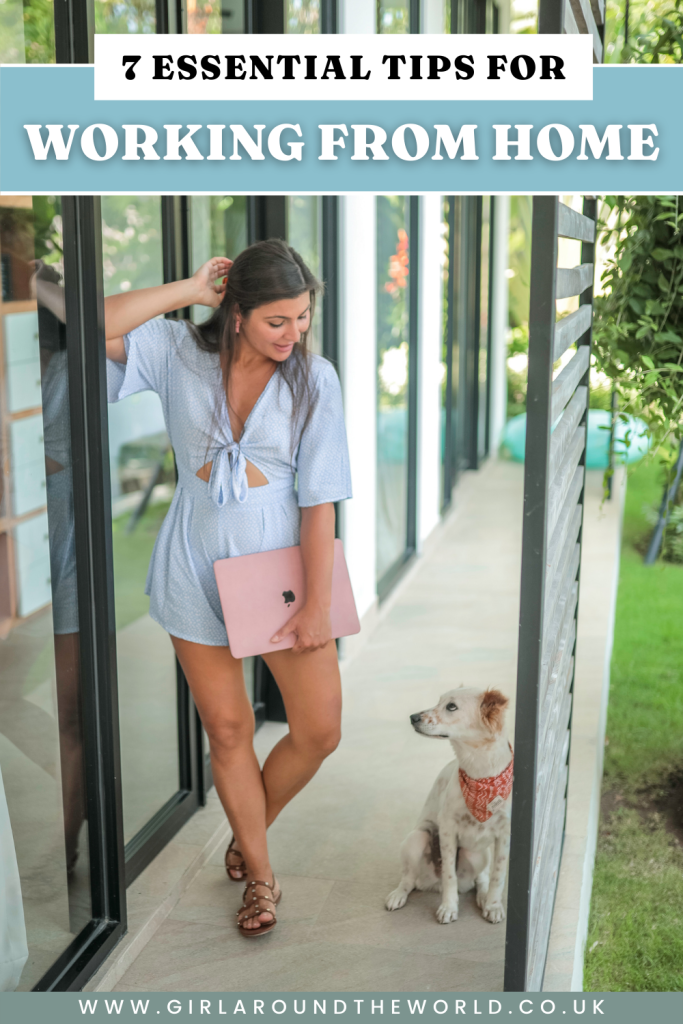
Working From Home Guidelines – 7 Essential Tips to Get You Started


If you’re new to remote working, don’t you worry! I’m here to help with some precious working from home guidelines. Scroll down to find my 7 essential tips to get you started with WFH from a remote work veteran (a.k.a. me!).

The pandemic got us all like… “huh, how do I hide my video during a Zoom call?!” during the transition from #officelife to #workingfromhome. Some of you might know a thing or two about this, while others might be complete beginners when it comes to this subject. Worry not, as I’m here to help you with my ultimate guide to working from home!

There are some mornings when I feel unmotivated, while on other days I feel ready to conquer the world. Regardless of my mood when I wake up, one thing’s for sure: if you’re a freelancer, entrepreneur or a new home-based employee, that task list won’t complete by itself!

So let’s get started:

1 – Create a good morning routine

A good day starts with a good morning, right after you wake up. This is the moment when the mood for the entire day will be set. So why not make the best of it, am I right?

In my experience being a digital nomad, I have found that my morning routine is one of the most important aspects of my day, regardless of where I’m based in the world. My routine is actually a key element in completing my task list, so I recommend creating a balanced morning routine that works FOR YOU!

Let me tell you a little bit about my routine, for example. I like to wake up at the same hour every weekday, early at 6.30am. I go to the gym (or do a home workout) at 7.00 before taking a long shower.  Then I make myself a matcha latte, take my time while preparing breakfast. Then I check my e-mails and to-do list for the day. And then I’m ready to go! My aim is to always be ready to work at 9.00am. That’s my official ‘clock in’ time. Depending on what’s on my priority list for the day, I either get dressed to get out of the house or I sit at my desk and open my laptop. And so the day begins!

Your morning routine might look different than mine – and that’s perfectly fine. Some people like to meditate in the morning in order to improve focus or do a quick yoga session. Or maybe you prefer skipping breakfast or drinking some hot tea instead of an espresso. Nothing wrong with that! The key here is to find what works for you and keep it consistent!

2. Get dressed!

work from home morning routine

Wondering how to get started working from home? Simple: get up and get dressed! 

The way we dress has a strong impact on our overall mood and productivity and it is known that getting dressed in the morning plays a key role in our productivity. I like to put on a comfy dress or one of my two-piece loungewear, apply some moisturizer and lip balm, brush my hair or do a messy bun and that’s it! 

Although staying in your pyjamas all day is a cosy thing to do, let’s face it: we don’t always feel like writing that complicated e-mail or finishing that long due report when we’re dressed for getting in bed! Plus, you’ll be much more prepared for those unexpected Zoom or Skype meetings when you’re already dressed up.

RELATED READ: WFH Loungewear: My Cozy must-haves

3 – Set up a proper home workplace

how to set up your work space when you work from home

This is one of the key tips on working remotely that has improved my productivity completely: setting up a proper workspace in my home. This means a separate space (if your house is big enough) or just a separate corner where you set up your desk, a good, comfy chair, your laptop and maybe even some plants as well (you know, for ambiance). This will be your spot where all work should be done – this means no working from bed or from your sofa, regardless of how cosy that may sound. 

Trust me, this will boost your productivity and maybe even your creativity as well and you’ll know that, once you get up in the morning and sit on THAT chair, you’ll be ready to rock the day!

TIP: I found out that, for me, having a minimalist work desk works best, with no clutter or distractions around me. If you need help with this, scroll down to find my recommended items for creating your working station at home!

4 – Create a realistic task list

planning tasks

Heh, this is one of the things I’m still struggling with. It’s extremely easy to overestimate the number of things you can do in one single day. It’s sooo easy to overcrowd your task list in the morning, only to realise by evening that you’re not even halfway to achieve your goal. 

And the main mistake here is not creating a realistic task list. Let’s be honest here: you don’t need to do everything in only ONE day in order to feel proud of yourself. You can spread those important tasks over the course of a couple of days, prioritising everything, and you may end up realising that everything was much easier than you expected.

If you ask me, knowing your limits is an extremely important aspect of feeling productive at the end of the day, so it’s better to prioritise and divide than to overwork yourself for nothing.

RELATED READ: What’s in my Camera Bag – All My Travel Blogging Gear

5 – Plan your work hours and breaks

working from home program

Here’s another key element in organising your work routine for the day: make sure to plan your work hours and breaks. And take them seriously!

When we work at home, it’s super easy to exceed that normal, healthy 8-hour limit for work hours and to end up working until 10 PM without even realising it. Or to be so focused on dozens of tasks at once that you forget to eat, drink water or stretch. But the good news is that there’s a simple solution here: plan your work hours and breaks in advance, preferably at the beginning of your day.

This way, you’ll know that, for example, you’ll work hard from 9 to 12, then have a one-hour lunch break where you enjoy some peace and quiet, then continue working until 3. Then you can take another small break for a snack or another cup of coffee, then finish your day by 5, if that’s a realistic timeframe for you. Just mix and match your work schedule until you find something that works for you, your job and your projects. And, most importantly, make sure to stick to that work-break schedule!

TIP: It’s strongly advised to get up and stretch for 1-2 minutes every hour. Trust me, your body will thank you at the end of the day!

6 – Hold strong boundaries with your housemates

how to work from home efficiently

Working from home full time can be challenging, especially if you don’t live by yourself. Maybe you live with your other half or you have some roommates or housemates. Or kids as well! That’s completely normal, but when you have a work schedule that you have to stick to, it’s important to communicate that with those around you.

Make sure your loved one knows that, even though you love spending time together, you won’t be available to watch movies or cuddle during your work hours, but you’ll be more than happy to spend time together after finishing your tasks. Same goes for your roommates as well. As for your kids, you can always create distractions for them during the day. So make sure everybody knows that, if they respect these boundaries, that will actually help you be more productive and proud of yourself at the end of the day. No negotiations here!

Strong boundaries will help you be more focused on your tasks without feeling guilty and without letting people around you distract you from what’s important when it comes to your work and personal projects. Communication and sticking to the plan are key elements here!

7 – Make sure you have the right home office essentials

Being focused and having a well-organised schedule are important factors, but that’s not everything you need in order to conquer the day! Yep, you also need some proper home office essentials, my friends!

It took me a while to find the best desk for me and the right chair, as well as the ideal laptop stand and the perfect noise-cancelling headphones. But it’s do-able!

In order to make the search MUCH easier for you, I have compiled a list with my recommended essentials that have helped me create the ultimate at-home working station:

Heh, what do you think? This was my complete list with essential remote working tips. If you find yourself asking “how can we work from home without distractions” or if you ended up searching on Google “how to survive working from home” in these pretty confusing times, I hope this article has helped you get started. 

I tried to compile a complete guide to working from home after thinking hard about the tips and tricks that have helped me over the years. And I’m pretty sure you’ll find everything you need here. 

Remember: the hardest thing is to get up and get started. Everything else will be a breeze if you have the right mindset and the right tools to help you. You can do this!

xoxo,

Melissa

Pin it for later!

7 essential tips for working from home
remote workers guide to working from home

Want To Stay In The Loop?

Sign Up For My Newsletter!

You’ll join my exclusive mailing list, plus you’ll gain access to my ever-growing free resource library!





Affiliate Marketing for Dummies – Best Affiliate Programs for Beginners


Are you on a journey of making sense of affiliate marketing? You have arrived in the right place! 

I’m a travel blogger and creator that successfully makes passive income thanks to affiliate marketing. And because all good things in life are meant to be shared, I want to offer you some precious tips and tricks today. And a lot of information I’ve learned by testing and experimenting. Are you ready for my affiliate marketing guide that includes the best affiliate programs for beginners?

Let’s jump right into it.

What is affiliate marketing and how does it work?

What is affiliate marketing and how does it work

I’m sure you’ve heard about affiliate marketing before and you may be dreaming of making huge amounts of money out of it. Who doesn’t want to wake up in the morning, open their laptop and see a big list of commissions? Heh, I know how it is. Although it’s… do-able, please be prepared for a long and often complicated journey. In order to get started, you’ll need to understand a few basic things about affiliate marketing. And I’m here to guide you:

The simple concept behind it

The simple idea behind affiliate marketing is the following: passive income. Affiliate marketing means that you, as the affiliate, promote someone else’s products or services. If they make a sale thanks to you, you’ll receive a small commission in exchange. Simple, right? Affiliate marketing and revenue sharing go hand in hand. 

If you’re still confused, here’s a simple scheme so you can better understand: Affiliate promotes brand -> Brand makes sale -> Affiliate takes a small percentage of sale via tracking link.

Now, speaking of tracking links…

What is an affiliate link?

Affiliate marketing exists in the online world. So you’ll need something to redirect people to a certain product and/or service. And that thing is… a link – or a hyperlink, if you must! Links will take the customer from your platform to the merchant’s site.

Affiliate links have something that’s called a “cookie”, which is a small piece of data that will help the website remember who you are or, more specifically, how you arrived on that website. In short, cookies are magical things that help the website remember that a client has reached the website/made a sale because you directed them there.

A cookie will be active for 30-90 days (it depends on each affiliate platform, of course) to track where the sale came from. So if a sale is made within that time frame, the affiliate gets a commission. Hey, presto! 

Everyone’s a winner: the reader has found a useful product, the brand has made a sale and you have generated a small commission for connecting the two. Easy-peasy!

How to make money with affiliate marketing

How to make money with affiliate marketing

I’m pretty sure you get it by now: you can make income using affiliate marketing by receiving either a fixed commission, or a percentage of the sale. So the key here is to have A LOT of patience and to understand that affiliate marketing is a slow, long-term process. Different platforms offer different payout systems. Here they are below, with explanations for each:

Now, all you need to do is to decide which one of these works best for you and your partners. The most common option is pay-per-sale, as it doesn’t require any upfront investment from the merchant; they only pay you when a sale is actually made.

Benefits of affiliate marketing

Benefits of affiliate marketing

Should you get started with affiliate marketing? Well, that’s completely up to you, but here are some awesome benefits of affiliate marketing:

Some people have got affiliate marketing down and have found a way to make a decent living from it. For the rest of us mere mortals, affiliates will start off as a nice little ‘side gig’ to our main income stream. This isn’t a bad thing at all! Small but passive income! With very little financial risk. Why not, eh?

RELATED READ: Working From Home Guidelines – 7 Essential Tips to Get You Started

When you should use affiliate marketing

When to use affiliate marketing

The answer is simple here: when you have a strong connection to a brand or product. Everyone can smell a fraud. Don’t be a fraud. Don’t promote something you don’t believe in. This leads us to one of the most important problems regarding creators and influencers today: a lot of people are tired of seeing brands being mindlessly promoted everywhere. You don’t want to bore or exhaust your audience. You want to provide them with precious recommendations based on your experience instead. So I cannot stress this enough: you should only promote products and services that you actually believe in and that you have tried and like yourself.

So, in short, you can use affiliate marketing when the following two statements are true:

Important things to know before getting started

There are many wrong impressions and assumptions about affiliate marketing. Don’t get fooled and don’t get discouraged either. But watch out:

  1. Affiliate marketing won’t get you rich fast. This is about playing the long game! Your goal is to generate a large, engaged audience who love clicking the links on your content. 
  2. Depending on the products you promote, your commission will be small. So you’re looking to get multiple sales
  3. Choose what products you put your efforts into wisely. Some may bring in $10-30 per sale while others will only give you a couple of cents. None of these options is wrong, you just need to analyse your audience and the products you’re promoting wisely.
  4. Promoting cheap, inferior products is the fastest way to destroy trust between you and your readers. Always prioritise your relationship with your readers above any affiliate partnership. If it doesn’t work for your readers, it doesn’t work for you!
  5. Make sure to update content that is no longer relevant. You will need to go back through old posts and update these to be current to continue to get good results with certain affiliate links.  
  6. Link hijacking – okay, I know this sounds terrifying, so let me quickly explain to you what this is. This is when someone hacks into your website and replaces your link with one of their own. If you’re just starting out, this isn’t likely to happen to you – but it’s worth keeping in mind and if it’s something that worries you, you can think about increasing your website security.

There are plugins you can get to protect your site, such as Jetpack.

RELATED READ: What’s in my Camera Bag – All My Travel Blogging Gear

My best affiliate marketing tips for beginners


My best affiliate marketing tips for beginners 2

This beginners guide to affiliate marketing wouldn’t be complete without some useful tips. Correct? Correct. So, without further ado, here they are:

HOW TO GET STARTED. Think of the brands you already love and you already talk about. Or products that fit perfectly into your niche that you can include seamlessly into your content. This is the best way to choose products to promote. If you’re already promoting a product, why not get paid for it?

TEST THE PRODUCTS AND SERVICES YOU ARE RECOMMENDING. Are you doing a product review? Make sure you have actually tested the product. Once again, no one likes a fraud. This will give you peace of mind that you are backing a good product and give proof to your audience that you actually use it / see it’s value too. 

THINK ABOUT TIMING AND NEEDS. Think of things that your audience needs right now. There needs to be a sense of urgency to their purchase or your links won’t convert to sales. eg. If you’re a fashion blogger, you don’t want to be promoting wooly jumpers in spring. However, promoting beachwear would be perfectly in time for the summer holidays.

BE TRANSPARENT. Affiliates should disclose that they are promoting a brand. You are offering something of value – there is no need to hide or trick your audience into giving you a commission. Also, the Federal Trade Commission (FTC) now requires that anyone who promotes a product and receives some form of compensation must do so transparently. Check it out here. If you want, you can hide a specific tracking link with a bit.ly link or other link shorteners, but make sure to not hide any collaborations from your audience.

BE CLEVER ABOUT HOW AND WHERE YOU PROMOTE YOUR LINKS. Use all your platforms – blog, YouTube, newsletters, instagram stories (those swipe up links man!). But, also remember that there are places that you won’t be allowed to use these links. For example, Amazon won’t let you use links in any emails (newsletters included!), PDFs, pop up pages, downloaded guides or e-books (even if they’re free). 

AFFILIATE MARKETING WITHOUT A WEBSITE. Yes, it is possible. You don’t necessarily need to have a website in order to make affiliate marketing work for you. You can use your Instagram account, your Youtube channel, your newsletter or even your Facebook page. 

Okay, now that you know all the basics of affiliate marketing together with some useful advice to make it work for you and your niche, let’s see how other people are successfully using it to create income.

Different ways of promoting your affiliate links

Let’s say that you now have your affiliate links all approved and ready to be posted. How do you promote them in order to not seem obnoxious? That’s a pretty sensible subject because, as I mentioned before, being honest and transparent is an important thing in establishing a strong relationship with your following. You don’t want to spam them with sponsored links all day long. You want to provide precious information and recommendations for them instead.

Here are some affiliate marketing examples that you can use in promoting your links across different platforms:

REVIEWS.

One of the best ways to promote a product or service is to make an honest review about it on your platform (blog, Instagram, Youtube etc). The keyword here is honest, of course. Even if you’re paid to promote a product, it’s important to offer a sincere opinion and, more importantly, it’s mandatory that you have tried the product or service yourself. If the product is good, then it’s worth promoting it and your audience will appreciate it even if you’re not praising everything about it!

COMPARISONS.

This idea is pretty similar to a product review, but you can actually “trick the system” and compare not one, but two good products. You can present them as alternatives, accentuating the differences between the two and recommending them to different categories of people. This is a popular method among beauty bloggers, for example, or people who review web hosting companies – but it can work across a wide range of products/services.

TUTORIALS.

Again, a similar idea to the reviews I was talking about above. The tutorials can actually be more informative and extensive than the reviews, if you wish. The key here is to offer a complete tutorial for a certain product or service and to address all the questions and concerns new users might have.

FAVORITE LISTS.

You can naturally insert affiliate links in listicle-type of articles, such as lists of your favorite products – favorite shampoos, “January favourites”, favorite boots for fall etc. This idea works on a blog or Youtube channel best, if you ask me, because you can naturally insert the affiliate links as hyperlinks on the text or in the description box of your video.

RESOURCE PAGES.

If you have a blog, website or an extensive mailing list, you can create a landing page that would serve as a resource page for your audience, promoting your favorite products/services related to your niche.

These are just some quick ideas that I’ve brainstormed here for you. Remember: you need to create strategies and come up with personalised ideas that will work for YOU and YOUR platforms. In order to do this, analyse your audience and their needs and you’ll quickly understand what to do next.

Best affiliate programs for beginners

Best affiliate programs for beginners

Heh, it’s hard to make a complete list here, especially if you’re looking for top paying affiliate programs exclusively. This really is completely dependent on your personal niche. I would really recommend sitting down and delving deeper into understanding your audience and what they want.

Confused? I got you. In order to help you out, I recommend downloading my free questionnaire to help understand your target audience. 

However, after researching a lot, I found that there are some general beginner affiliate programs that I would whole-heartedly recommend. Here’s my list of the best affiliate marketing programs for beginners:

Best affiliate networks you can join

Best affiliate networks you can join

If you’re still struggling about how to find affiliate marketers, I have another amazing tip for you. Other than individual websites and merchants, an excellent idea is to sign up for affiliate networks. These affiliate marketing companies are specialised platforms that can manage the entire affiliation mechanism for you; they’re basically a link between you and several different merchants. This means no communication between you and the owner of the product/service! You just need to apply and get accepted by your favorite merchants listed in each affiliate network’s database and you’re good to go.

Here are the best affiliate marketing websites for beginners out there:

Most of the affiliate networks above offer you some pretty sweet insights as well, such as average conversion rates and sales for the merchants you can apply to.

In case you were wondering how to get started with affiliate marketing, my guide above is a very good resource to get you up and running – or at least a starting point for further research. I tried to combine all my knowledge and all my best tips and tricks in order to make your life easier! 

Remember: affiliate marketing is a slow process, so you’ll need quite a lot of patience and determination. Do your research. Find your niche and the best products and services for your audience. Don’t expect to get rich overnight. And you’ll be just fine. 


xoxo,

Melissa

Pin it for later!

A bloggers guide to affiliate marketing
How to make affiliate marketing work for you

Want To Stay In The Loop?

Sign Up For My Newsletter!

You’ll join my exclusive mailing list, plus you’ll gain access to my ever-growing free resource library!