Beginner’s Guide to Photography – How to Shoot Manual Mode
Are you a passionate, beginner photographer with a desire to expand your knowledge? Want to achieve more with your camera and produce higher quality images?
If you’ve been dreaming of shooting in manual mode but you’ve been scared of all the complicated settings… I got you! There’s no need to postpone the move to manual or to feel confused by your camera. This complete guide for how to shoot manual mode is here to HELP!
Get ready to set your creativity free with new opportunities only achieved by shooting manual! Sure, using the “Auto” mode is a safe and sound way of getting your pictures done quickly and pain-free, but where’s the fun in that?
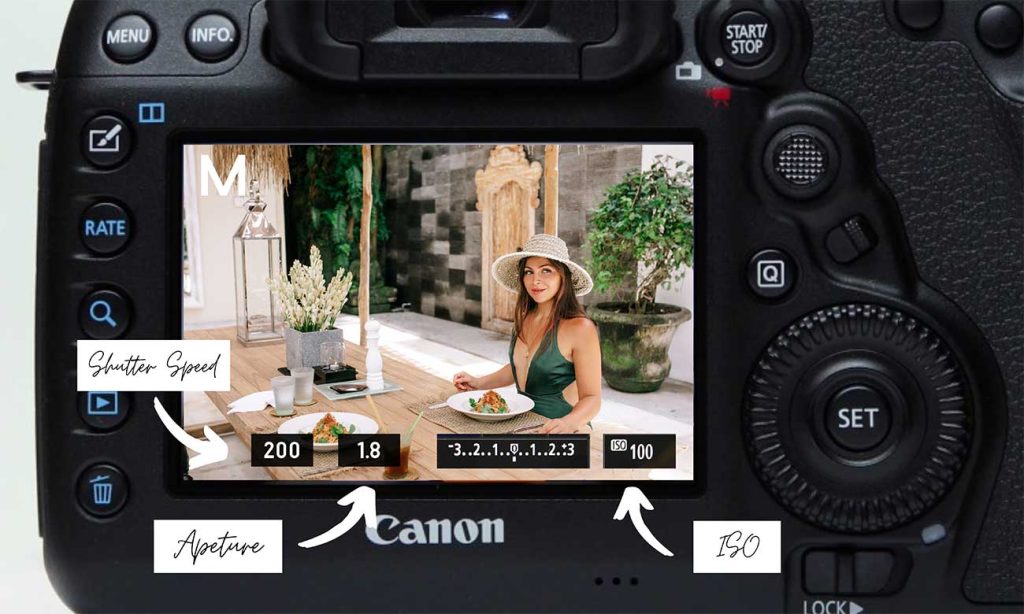
To master manual mode, we need to learn how to control the four important elements of photography: ISO, shutter speed, aperture and white balance.
Let’s delve in and get on our way to flawless manual photography. Are you ready?

Why shoot in Manual Mode?
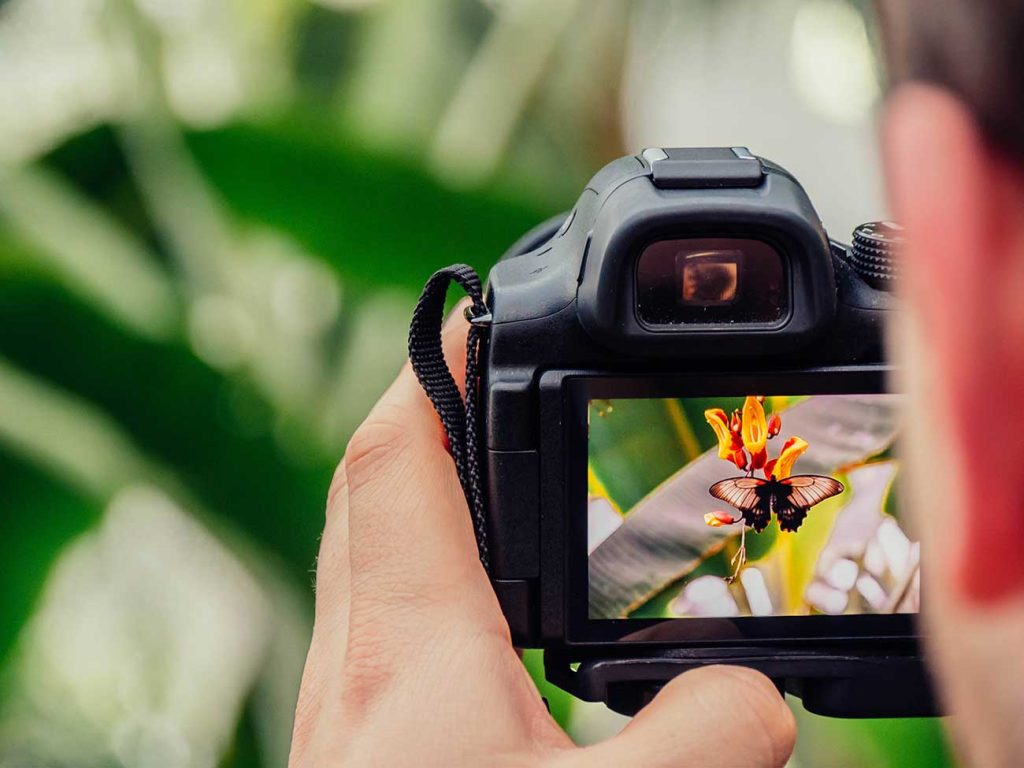
Let’s say you just bought a new, fancy, professional camera (oooh, eer). You’ve been taking pictures with it for a while, using mostly the Auto mode, and while your pictures are high-quality, you keep looking at other creator’s work (done with the same gear) and it’s just… different. You notice they’re doing a better job, maybe their pictures have a more cinematic look to them or a more professional feel overall. What’s the difference? You might ask. What are they doing differently? Heh, the answer is simple, my friends: they’re shooting in manual mode.
What is Manual Mode?
Okay, but what’s so amazing about shooting in manual mode compared to other modes? Easy: when you do manual photography, you have absolute control over all your camera’s settings – ISO, shutter speed, aperture and white balance.
These terms sound scary to you? Don’t worry, I’ll cover each of them down below. When you shoot in Auto, you basically let your camera “decide” everything for you. And professional photographers don’t really want that, do we? Nope. We want control.
If you’ve been dreaming of achieving pretty bokeh portraits (those beautiful blurry, artistic backgrounds), taking moody flat lays or shooting movement without ending up with blurred blobs of subjects, your camera’s manual mode is the answer. While the automatic mode is a good way of taking straight-forward pictures, this “universal” mode does not work perfectly in all situations, unfortunately.
Here’s another situation: let’s say you want to shoot a gloomy portrait in low light. Your camera’s flash will automatically turn on, although you’d prefer to not use any external light. This ruins your setting and it can get pretty frustrating at times. The solution? Once again, Shooting manual.
Sure, there’s a… let’s say ‘downside’ to this shooting mode – everything will take a bit longer. While it’s quick and painless to take a picture on Auto mode, achieving that perfect result will require a bit more patience and experimenting when it comes to Manual mode. At least at first, while you’re getting used to everything!
TIP: I know I’ve mentioned about ten times now that shooting in manual mode is THE best way to go, but if you’re just starting out and you need to shoot something in movement, such as street or sports photography, it’s best to set your camera to a quicker mode such as Auto or Aperture priority. It’s better not to lose your shot completely in these situations, so make sure to set your priorities straight!
Now that you know everything about all the advantages of shooting manual over automatic, let’s dig in deeper and find out how to ACTUALLY do it!
4 Important elements to master for shooting in manual mode
1 – ISO
ISO. Three letters, an ocean of questions. What’s up with this ISO everyone’s talking about?
If you want me to get super specific, I can tell you that ISO literally means “International Organization for Standardization”, but that surely won’t be very clarifying. So let me explain it in standard human words. In short, ISO means your camera’s sensitivity to light. Unlike the shutter speed or aperture, which are both physical settings, ISO is a digital adjustment that your camera makes according to the setting you’re photographing. Or, more accurately, a digital adjustment that YOU make! We’re talking about all-manual shooting, baby!
FUN FACT: If you’re familiar with film photography (at least a tiny bit), you might know that different films have different values written on the package (100, 200, 400). This is the film’s sensitivity to light. Exactly like a digital camera’s ISO.
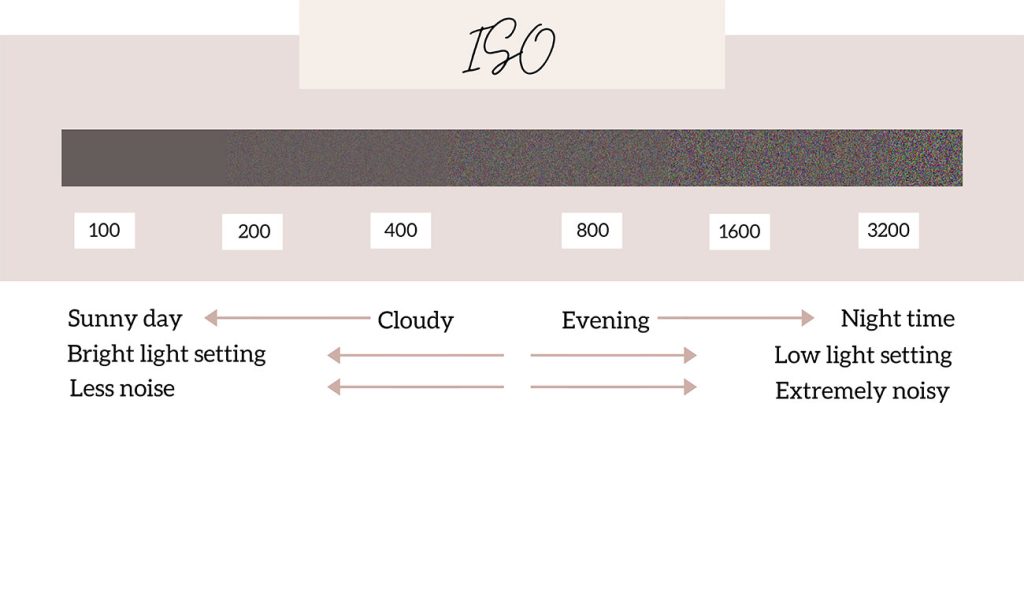
In short, if you set your ISO to a higher number (let’s say 800 or 1000), this means you’re allowing your camera to pick up more light from the environment. This is a great way to compensate for the lack of light in some “harsh” conditions. On the other hand, if you’re shooting on a sunny day, it’s best to set your ISO as low as possible, such as 100.
TIP: After a lot of experimenting with different ISO settings in dark conditions, I recommend to not set your ISO too high (above 1600, for example), as this will result in higher chances of ending up with a lot of noise in your pictures.
Of course, this depends on how high your camera performs. A way to avoid raising your ISO, for example, would be widening your aperture instead. To prevent your ISO going too high, I’d go for that. If these words still sound strange to you, don’t worry, by the end of this article you’ll understand everything I’m saying here.
What is noise?
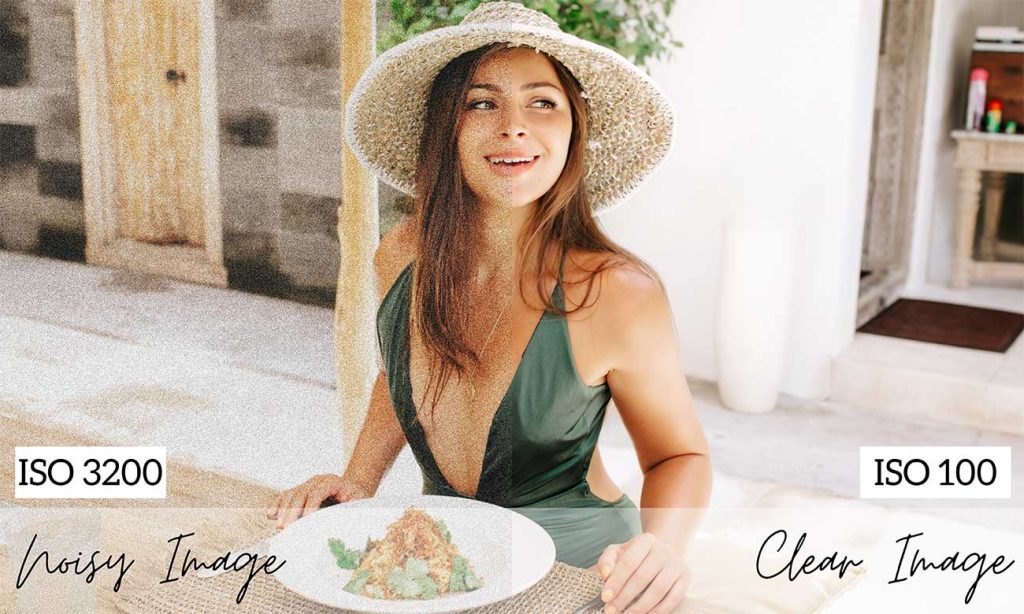
In photography, “noise” is similar to grain and it pretty much looks like little bits of discoloration or strange-colored pixels. In short, noise makes images look bad and “uneven”. This visual flaw often happens when shooting in low light.
In order to better understand what the HECK I’m talking about, the key is to experiment. Here’s a short ISO challenge that you can try. Go outside at different times of the day. Decide on a fixed shutter speed and aperture, but play with the ISO.
First, set it to 100 – if it’s super sunny outside, you’ll see that your picture ends up pretty balanced. Then raise it to 400 – if it’s a bit cloudy, this ISO value could work best. If it’s dark, let’s get serious and set the ISO to 1600. You can consider this to be your cheat-sheet, but the best way to get used to all this information is to try out different settings and see what each of them does.
2 – Shutter speed
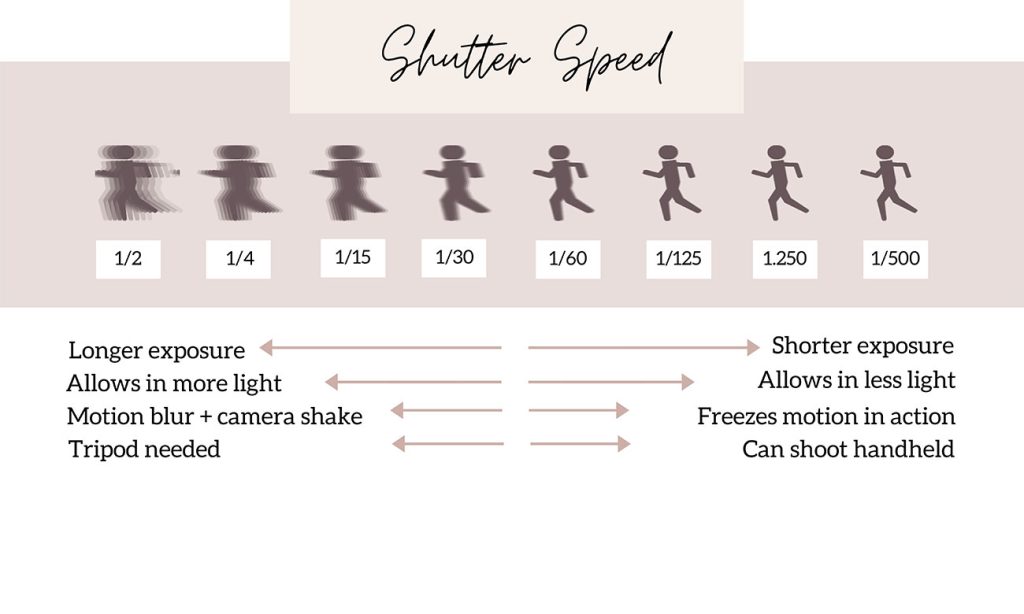
Okay, let’s proceed to the next term. Shutter Speed. This is literally the amount of time your camera’s shutter stays open when taking the picture. During this time, light gets in and “tickles” the camera’s sensor, and then the image is “born”.
Following this logic, if your shutter stays open for only a super short amount of time, your image will end up being darker. If the shutter stays open for longer, this means more light can get in and reach the sensor, so your image will be brighter.
Easy, right? I told you I can explain this stuff!
Another conclusion to these facts is that, if your shutter stays open for a short time, your photographed subject will “freeze” in the frame instantly, whilst if your shutter stays open for longer, you’ll end up with some motion blur.
TIP: If you’re taking action shots, setting your camera to a faster shutter speed is the way to go to get your subjects perfectly sharp and in focus.
A standard shutter speed to play around is 1/125, which literally means a fraction of a second. By the way, it’s best to not set your shutter speed below 1/60, as you’ll end up with shaky images. If you don’t have any other solution, make sure you’re using a good tripod to avoid blurriness.
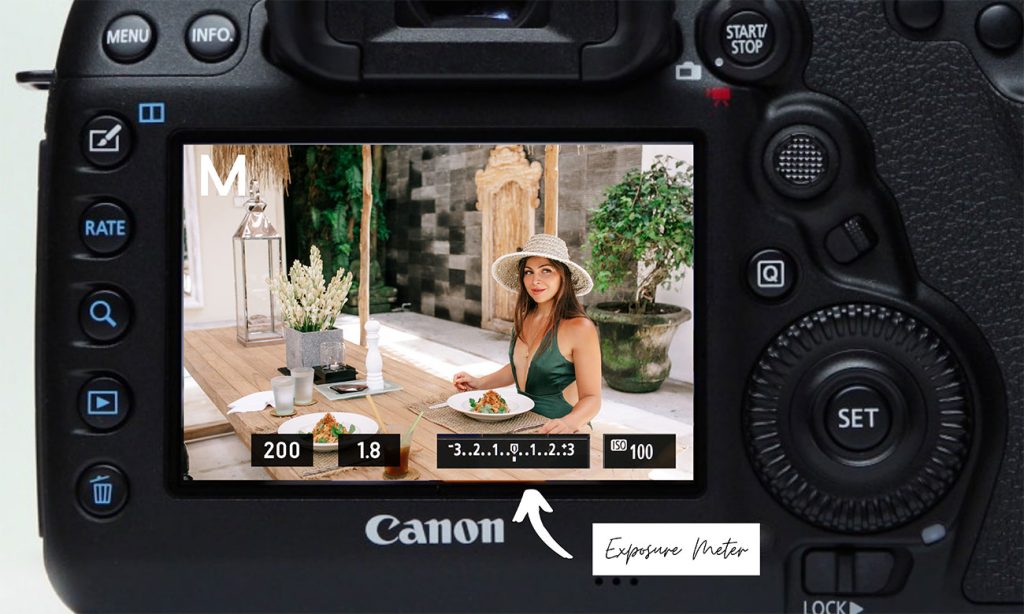
EASY CHEAT: No matter which of the settings you are adjusting (ISO, shutter speed, aperture), you’ll want to always be aware of how your changes are effecting the final image. An easy way to keep on top of this is to check your camera’s exposure meter. You’ll find this meter by looking through the viewfinder. It’s basically a long horizontal line with many vertical lines. The bold vertical line in the middle with a “0” underneath is the setting you are aiming for. Think of the meter as a way to gage that you are achieving a balanced image and the central “0” point signifies that you’ve got it “just perfect”,
This is a good place to start when starting off on manual mode, so make sure to check your meter each time you adjust your settings. Of course, this is just an approximation dictated by your camera, so, as I mentioned before, when you’ve gained some confidence, make sure to experiment with this too!
3 – Aperture
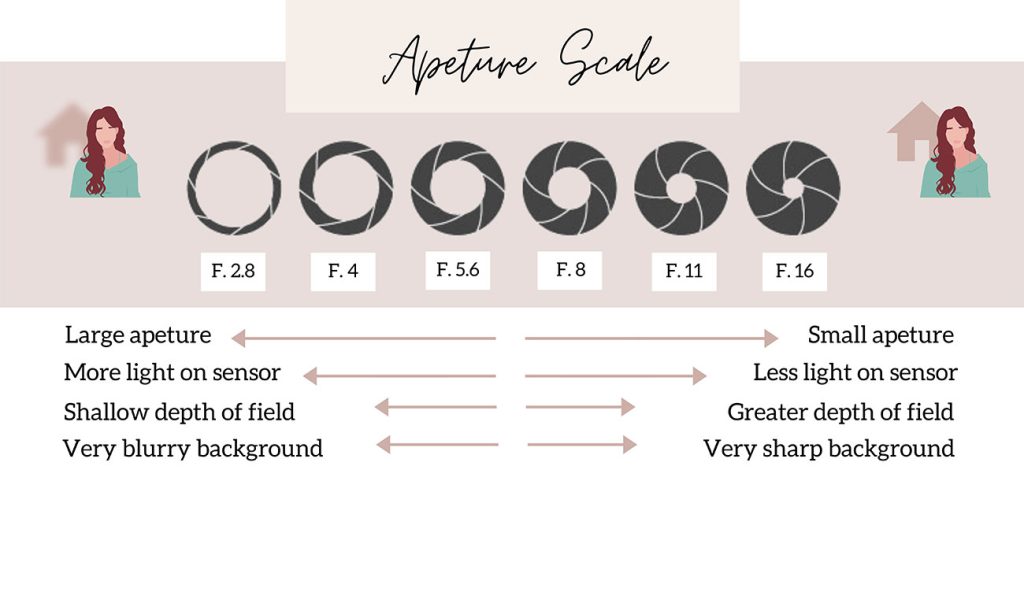
Okay, here’s where things get a bit more complicated, but please bear with me. The meaning of “aperture” is pretty intuitive. It’s basically an opening in the middle of your camera’s lens that dictates how “open” your lens is. Following this logic, if your aperture is large (wide opening), your image will be brighter; if your aperture is small, your image will be darker. The reason why I’m saying that things are a bit more complicated when it comes to aperture is because the numbers are… the other way around.
Hear me out: a bigger aperture of your lens (also known as an f-stop) is f/1.4, for example. Big aperture equals small value. Counter-intuitive. On the other hand, a smaller aperture is f8, for example. Smaller aperture means bigger value. You get me? Confusing I know.
Another super important thing to know is that aperture is also responsible for how much of your subject or setting will be in focus – a thing called “depth of field” in photography. Hey, we’re already getting to a PRO level here!
If you want professional looking images where the subject is in focus and it has a blurry background with lots of pretty bokeh, you’ll want to go for a bigger aperture, so smaller values – such as f/1.4. The same works the other way around: if you want an image where everything is super sharp and in focus (maybe a landscape?), go for a bigger aperture value such as f/8.
TIP: A good, middle value to start experimenting with is f/5.6 And maybe a good idea would be to avoid f/11 or f/16 in the beginning, as your pictures may end up super dark or look dull and boring.
CHEAT-SHEET:
- A small number like f/1.4 means: big aperture, bright image, lots of bokeh in the background;
- A bigger number such as f/8 means: small aperture, darker image, sharp background;
- A middle number such as f/5.6 works best if you want something in-between the two.
4 – White balance
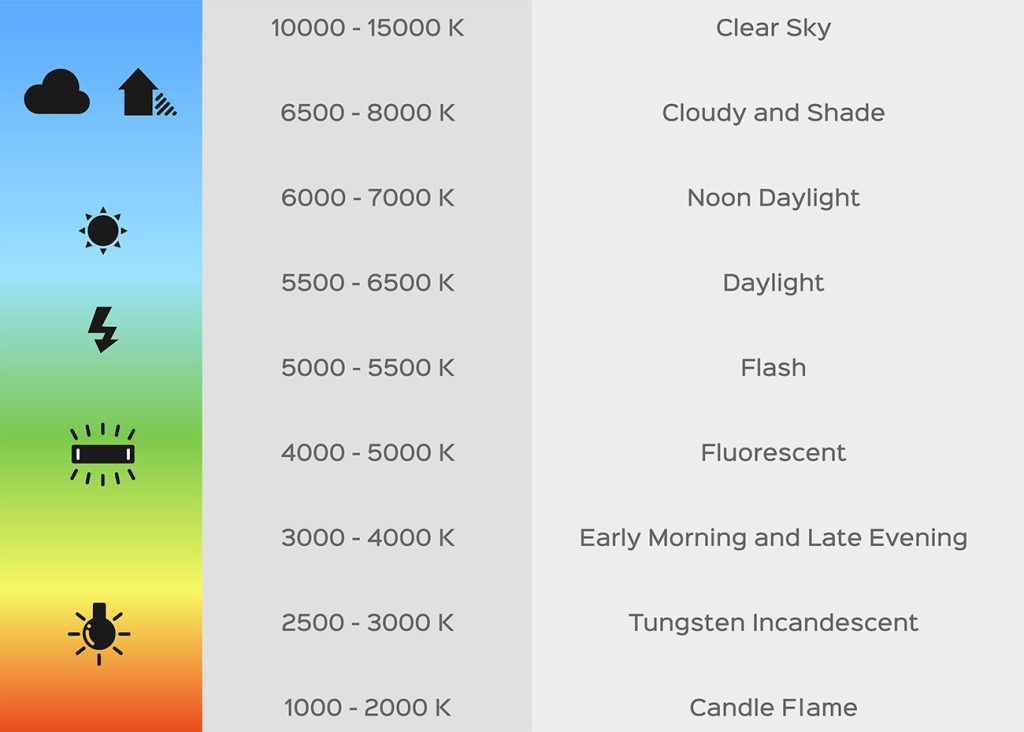
Good news: we’re done with all the complicated terms! White Balance is a simple concept which I’m sure you’ll understand right away. Your white balance settings will basically determine your image’s tones – either warmer or cooler. Of course, this has everything to do with your light source: the sun, a lightbulb, a neon light etc.
For starters, you might want to achieve a neutral result, good for product photography, for example. This means your tones won’t be neither yellow-ish, nor blue-ish, but something in the middle… meaning balanced! White Balance, get it?! The logical way to do this is to have a colder White Balance if you’re working in a warmer environment and a warmer one in a colder setting. These values will balance each other and you’ll end up with a neutral image. The best way to do this is to look at the white values in your image.
Of course, this isn’t a rule to live by. Your image’s tone is a key element in dictating the mood of your photograph, so you can very well go for warmer or colder tones if this will help your end result. Generally speaking, your WB preferences can’t be wrong! And, after all, you can always tweak this in post-production, especially if you’re shooting in RAW format (more about this below).
TIP: Tweaking your white balance is a great way to fix red skin in your pictures. So make sure to experiment with different White Balance settings!
There are also useful presets/modes that you can use – such as the Tungsten one (good if you’re shooting under a warm light bulb) or Daylight (good for shooting outside when it’s sunny). For starters, you can grab your camera and start experimenting, starting with a white balance of 5300 if you’re outside, for example.
CHEAT SHEET:
- Warmer tones – 5900 and above.
- Colder tones – 5000 and below.
Things to keep in mind when shooting in Manual Mode
Now that you know everything about the basics and the most important elements for shooting in manual mode, read on to find my list of things to keep in mind when shooting manual:
- Don’t be afraid to experiment! Taking digital images is free, so your mistakes will cost you literally nothing!
- Don’t rush; take your time to find the perfect settings for your shot each and every time. With time, you’ll get more and more used to the process and everything will be faster!
- Make sure you don’t forget to tweak your settings when your shooting conditions change, such as the amount of light you have, moving indoor or outdoor, or the movement of your subject;
- And probably the most important advice: make sure you shoot in RAW mode. Ditch the JPEG mode for the RAW one, my friends! When you’re shooting RAW images, this means you’ll have complete freedom when you’re editing and post-processing your photographs. You can freely change the white balance, the exposure, contrast, highlights, shadows and everything in-between. The JPEG format definitely won’t offer you as much freedom in the editing stage. Mark my words, RAW is the way to go! After edits, just export your image as a JPEG and you’re good to post!
RELATED READ: What’s in my Camera Bag – All My Travel Blogging Gear
Step-by-step guide on how to choose your settings on Manual Mode
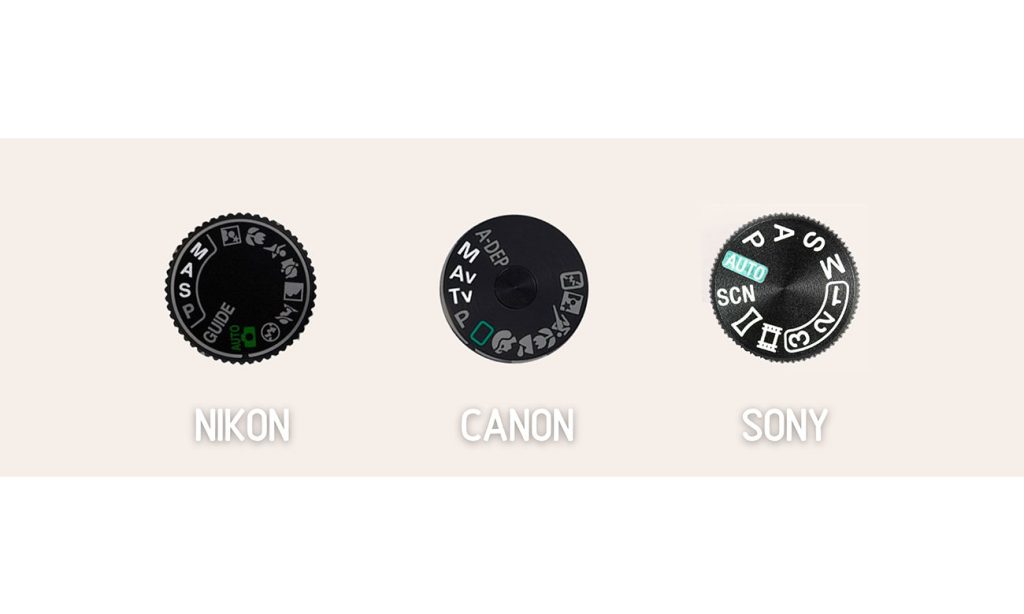
First step: set your camera to Manual Mode, of course! You’ll see that most cameras have a little wheel with some letters on them and M stands for Manual.
Next, it may be a good idea to start on a sunny day. Here are some good settings for this:
- ISO 100
- Aperture f/5.6
- Shutter Speed 1/500 (or anything else that “ticks” the center of your camera’s meter)
- White Balance 5260
You can start with these settings and see how your final picture looks. Analyse the result and decide if you need to tweak your settings or not. If your picture ends up being too dark, you might want to change your shutter speed to 1/250. Remember to always check your meter, most of the times it approximates correctly!
Again, don’t worry if your picture isn’t perfect. In fact, practice makes perfect and you can always adjust all the 4 settings I was talking about above in order to achieve your desired result. Afterall, photography is art and art is all about preference!
Wait, what about the focus?
Manual focus vs auto focus? I didn’t tell you anything about them until now! Well, I prefer keeping my focus on auto (AF), even when I’m shooting manual. Your focus is a separate thing from your other settings, so nobody will blame you for keeping it on automatic! In fact, in most scenarios this is better. And quicker! In case your autofocus fails and you’re doing some close-ups of specific areas of your subject then sure, release the beast and go manual with your focus as well (MF).
RELATED READ: Sparkler Photography – The Secret for Perfect Sparkler Pictures
BONUS: Other shooting modes (Program, Aperture Priority, Shutter Priority)
I recommend taking things slowly, step-by-step. If you’ve only been shooting on Auto mode until now and you don’t feel comfortable jumping into the world of manual shooting right away, a good idea is to start building your way up by experimenting with the other modes on your camera. Here they are below, explained:
- Program Mode (P) – the camera controls the aperture and shutter speed, but you have full control over the ISO and white balance;
- Aperture Mode (A or Av) – you can freely choose your aperture value (f-stop) and the camera will do the rest. Shooting in Aperture mode is a good place to start if you want to experiment with bokeh!
- Shutter Priority Mode (S or Tv) – you choose the shutter speed and the camera will do the rest – this is a great mode to start with if you’re shooting sports or other moving subjects;
Aaand that was about everything I wanted to tell you in this manual photography tutorial! If you’ve carefully read this article about how to use the manual mode on a DSLR camera, then you’re ready to grab your camera, go out and experiment with all these settings.
P.S.: Sign up to my resource library and you’ll find a great Manual Mode Cheat Sheet there with all the information you need + other useful stuff!
Remember: don’t be afraid to experiment, take your time and take things slowly. If you follow everything I explained above, you’ll be a professional in no time. And practice, practice, practice! I have found that taking my camera everywhere with me helped me get used to doing photography in manual mode much faster. So what are you waiting for?
xoxo,
Melissa
Want to know more about travelling to Bali?
- Check out all my Bali Travel Guides here.
- Need to book your flights? Head over to Skyscanner!
- Time to book your boat to get to the Islands? Head over here.
- Not get travel insurance??? Get it – it’s not a hassle you want to risk!
- Don’t forget to download my nifty Google Maps Guide for your trip to Bali so you don’t miss a thing!
Pin it for later!

Sign Up For My Newsletter!
Want to stay in the loop? Join my exclusive mailing list, plus you’ll gain access to my ever-growing free resource library!